
Friday, June 29, 2012
Hummus
My daughter put in a request for hummus. I thought it would be great to teach her how to make a traditional recipe, using the food mill. When you mention hummus, to a person who has never tried it, they tend to right away say they don't like it. Or if they know a little bit about hummus, they say they don't like the texture. If you are put off by the texture, it is the same as a bean dip. Hummus is just a bean dip!
I begin with a can of Garbonzo beans, reduced sodium, if you can find them. The beans are drained and rinsed. Then they are put in a pan with a little water, and cooked a few minutes to soften. A tahini mixture is made and blended with the beans, using the food mill.


I like to make a platter; serving pita chips and vegetables alongside the hummus. Serve as an appetizer, or for a light dinner works well in the summertime.
HUMMUS
INGREDIENTS:
1 (15.5 oz) Can Garbanzo beans, drained
1/2 Cup water
1/4 Cup lemon juice
1/4 Cup tahini
1 Clove garlic, minced (I use roasted if I have on hand)
1/2 Teaspoon kosher salt
GARNISH:
1 Teaspoon olive oil
Paprika
1/2 Teaspoon parsley, chopped
Drain and rinse beans. Put beans in a small sauce pan, with water. Bring to a boil. Reduce heat to medium and cook beans for 5 minutes. Remove from heat. In a small bowl blend juice, tahini, garlic and salt. Place a food mill over a bowl, to stabilize. Using a slotted spoon, put spoonfuls of garbanzo beans into the food mill. Add tahini mixture, with the beans. Process all ingredients through the food mill. Stir all ingredients. To serve: place dip in a bowl and make a well in the center, to hold the olive oil. Sprinkle with paprika and freshly chopped parsley. Serve with toasted pita chips and fresh vegetables.
I begin with a can of Garbonzo beans, reduced sodium, if you can find them. The beans are drained and rinsed. Then they are put in a pan with a little water, and cooked a few minutes to soften. A tahini mixture is made and blended with the beans, using the food mill.


The result is a smooth bean dip. Smoother than you would ever get if you processed the ingredients in the food processor, or blender.

The casing from the bean is left behind!

I like to make a platter; serving pita chips and vegetables alongside the hummus. Serve as an appetizer, or for a light dinner works well in the summertime.
HUMMUS
INGREDIENTS:
1 (15.5 oz) Can Garbanzo beans, drained
1/2 Cup water
1/4 Cup lemon juice
1/4 Cup tahini
1 Clove garlic, minced (I use roasted if I have on hand)
1/2 Teaspoon kosher salt
GARNISH:
1 Teaspoon olive oil
Paprika
1/2 Teaspoon parsley, chopped
Drain and rinse beans. Put beans in a small sauce pan, with water. Bring to a boil. Reduce heat to medium and cook beans for 5 minutes. Remove from heat. In a small bowl blend juice, tahini, garlic and salt. Place a food mill over a bowl, to stabilize. Using a slotted spoon, put spoonfuls of garbanzo beans into the food mill. Add tahini mixture, with the beans. Process all ingredients through the food mill. Stir all ingredients. To serve: place dip in a bowl and make a well in the center, to hold the olive oil. Sprinkle with paprika and freshly chopped parsley. Serve with toasted pita chips and fresh vegetables.
Sunday, June 24, 2012
Mom's Ribs and Rice
Mom used to make us Ribs and Rice. It was in her cooking rotation, and we all loved it. It is classic comfort food. Nothing fancy. Just down home cooking. Mom used country style ribs, which she boiled, on the stove, until fork tender. I prefer to use the crock pot. Still cook them to fork tender, you just don't have to keep tending to them.

Once the ribs have cooked through, transfer to a 9 X 13" baking pan and season both sides.

Then prepare a BBQ sauce. I remember when KC Masterpiece hit the market. It was popular at our house. Mom would ship cases of it to her sister, and mother, in California. As good as the bottled sauce was though, mom doctored it up a little by adding ketchup, brown sugar and honey. That was the chef in her coming out!


Since your ribs are already cooked. You can sit these under the broiler for a few minutes, until the BBQ sauce begins to glaze onto the ribs.

Serve, family style, over a bed of rice. I chose brown rice, but you can make white, if that is your preference. For a meal that will "stick to your ribs" I give you:
Moms Ribs and Rice:


When the fat nears the bottom, I stop. Now is a good time to take this container to the refrigerator. The grease will harden, then you can throw it in the trash can. Never pour grease down the disposal, it is an amature cooking move that will cost you in plumbing bills! Speaking of disposals. You really shouldn't use them. They are really just available for you to say you have one. Always scrape your plate and throw your trash in the can, recycling bin, or compost bin. You get the idea.
Set aside 3 cups of broth to use in the brown rice recipe.

Making rice isn't difficult. You start with lightly toasting the rice. Then add seasoning and broth. Bring to a boil and cover tightly. Reduce heat and wait! Wait a long time if it is brown rice. To check for doneness, just tilt your pan. If there is water, cook longer. No water, you're done! Never stir. Stirring causes sticky rice, and that is not what we are going for in this recipe.

Perfectly cooked brown rice. Just fluff with a fork, and serve.

Once the ribs have cooked through, transfer to a 9 X 13" baking pan and season both sides.

Then prepare a BBQ sauce. I remember when KC Masterpiece hit the market. It was popular at our house. Mom would ship cases of it to her sister, and mother, in California. As good as the bottled sauce was though, mom doctored it up a little by adding ketchup, brown sugar and honey. That was the chef in her coming out!

It doesn't really matter if you use bottled sauce, or make your own. I have found that Sweet Baby Ray's tastes just like mom's doctored up version.

Whatever you decide, just make sure you dunk the ribs into the sauce. Then pour any remaining sauce over the ribs. You will appreciate extra sauce over your rice later.

Since your ribs are already cooked. You can sit these under the broiler for a few minutes, until the BBQ sauce begins to glaze onto the ribs.

Serve, family style, over a bed of rice. I chose brown rice, but you can make white, if that is your preference. For a meal that will "stick to your ribs" I give you:
Moms Ribs and Rice:

RIBS:
5 to 6 Pounds Country Style ribs
2 Cups water
SEASONING:
1 Teaspoon chili powder
1 Teaspoon paprika
1/2 Teaspoon cayenne pepper
1/2 Teaspoon cayenne pepper
3/4 Teaspoon granulated garlic
3/4 Teaspoon kosher salt
3/4 Teaspoon pepper
BBQ SAUCE:
1 Cup KC Masterpiece Original BBQ Sauce
1/4 Cup Heinz ketchup
1/4 Cup brown sugar
3 Tablespoons honey
DIRECTIONS:
Place ribs and water in a crock pot. Cook on high several hours, until meat is fork tender. Transfer meat to a 9 X 13" baking tray. (Reserve the broth from the ribs, to use in the rice). In a small bowl, combine seasoning. Sprinkle seasoning on both sides of meat. Combine all BBQ sauce ingredients into a medium sauce pan. Bring sauce to a boil. Remove from heat. Dip rib pieces into the sauce, then return to the baking pan. Drizzle any remaining sauce over ribs. Broil ribs until heated through and glaze starts to forms. Serve over rice. Serves 6.
--------------------------------------------------------------------------------------------------------
--------------------------------------------------------------------------------------------------------
To make the rice, we are going to start at the point the ribs have finished cooking, in the crock pot. We need to clean up the broth. Best way to do that is to strain into a small bowl.

Once the fat and suet have been separated, we can continue on and remove the fat. I use a baster to pull up the broth, from under the fat line. Then I transfer to another container, outfitted with a coffee filter. It's a little work, but worth the effort. You will be rewarded with a clear, fat free broth. This method works, as long as you use a clear bowl, to see that fat line. If not you can purchase a de-fatting cup, but why? I just showed you how to do it, and saved you 5 bucks!
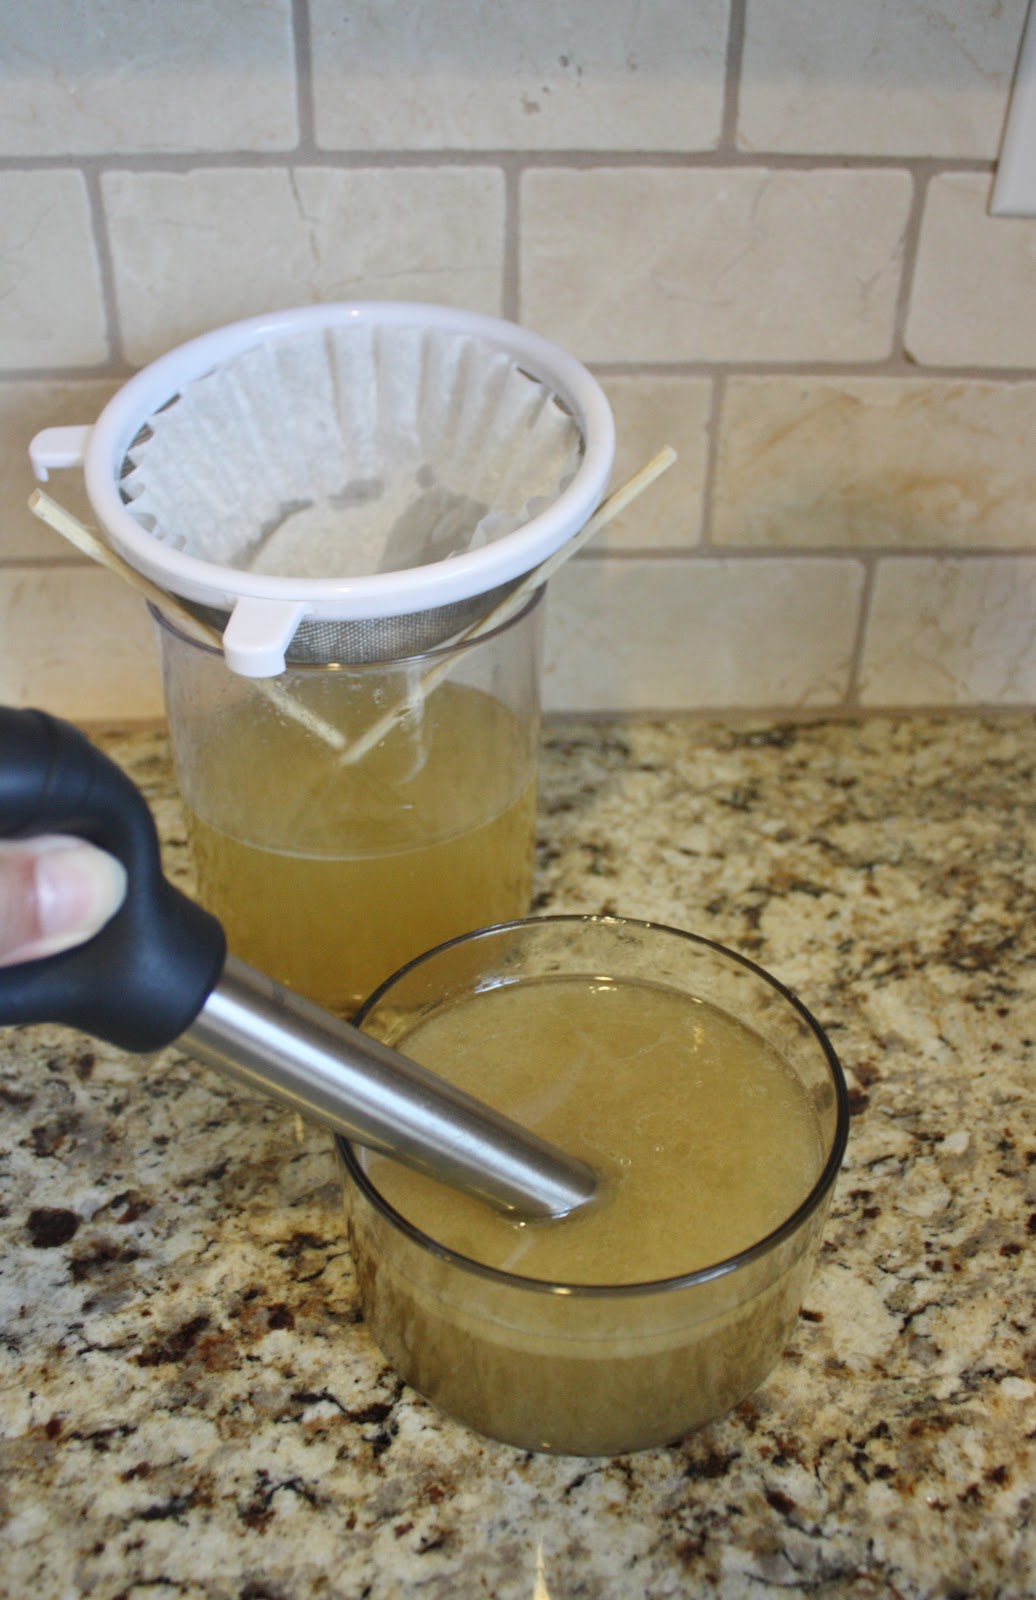

When the fat nears the bottom, I stop. Now is a good time to take this container to the refrigerator. The grease will harden, then you can throw it in the trash can. Never pour grease down the disposal, it is an amature cooking move that will cost you in plumbing bills! Speaking of disposals. You really shouldn't use them. They are really just available for you to say you have one. Always scrape your plate and throw your trash in the can, recycling bin, or compost bin. You get the idea.
Set aside 3 cups of broth to use in the brown rice recipe.

Making rice isn't difficult. You start with lightly toasting the rice. Then add seasoning and broth. Bring to a boil and cover tightly. Reduce heat and wait! Wait a long time if it is brown rice. To check for doneness, just tilt your pan. If there is water, cook longer. No water, you're done! Never stir. Stirring causes sticky rice, and that is not what we are going for in this recipe.

Perfectly cooked brown rice. Just fluff with a fork, and serve.
BROWN RICE
INGREDIENTS:
INGREDIENTS:
1 Tablespoon olive oil
1 1/2 Cups brown rice
3 Cups rib broth (strained and de-fatted)
1/2 Teaspoon salt
DIRECTIONS:
Choose a large sauce pan, with a tight fitting lid. Heat olive oil in sauce pan over medium high heat. Add rice and cook a few minutes, stirring to coat rice in oil. Add broth and salt. Stir. Bring to a boil. Place tight fitting lid on sauce pan. Reduce heat to medium low. Cook for 45 to 55 minutes, until rice is done. DO NOT STIR rice to check for doneness. Tilt the pan and look for water. If there is water, the rice is not done. If there is no water, then rice is done. Makes 5 cups cooked rice.
Saturday, June 23, 2012
Hungry Bear Chocolate Chip Cookies
Hungry Bear cookies originated in Fresno, California. Deryl Bear spent 20 years perfecting his cookies. His first store was opened in 1983 at Fig Garden Village. That year, Hungry Bear was voted "best cookie", in the Fresno Bee.
This recipe was given to me from my mother-in-law. She obtained it through channel 47 TV. I always thought it was weird for a popular cookie shop to give out their recipe. So, since they volunteered the recipe, I see no reason not to pass along this fabulous chocolate chip cookie recipe.
I want to point out something. When making cookies, sometimes the instructions are given to beat until light and fluffy. Here is a photo of what light and fluffy looks like. Notice, it is not flat and grainy. In essence, you beat the sugar and butter for several minutes, until the granules of sugar have dissolved into the butter, like this:

I have a feeling this post is going to be filled with tips! Another bit of advice I would like to give, when any recipe calls for vanilla, get real vanilla! Do not waste your money on expensive imitation vanilla extract. If you happen to have a Sam's Club or Costco membership, you can buy the real vanilla for the price of the imitation stuff sold at the local grocery store!
Now, since this recipe yields 56 cookies (using a 1 3/4" cookie scoop), I flash freeze the scooped cookie dough, onto a baking sheet. After the dough is frozen solid, I shrink wrap, for future use. This is convenient, for our family, as we are not going to eat 56 cookies in a short amount of time. Really, do you want to eat cookies, the next day, that are stale? Or do you prefer your cookies baked fresh? I think it's a no brainer that people enjoy freshly baked cookies, over stale cookies pulled out of Grannie's cookie jar.


A quick mention on shrink wrapping systems. I've picked up several Food Saver brand systems from yard sales. They work good. They work just as good as this Kenmore system. In fact, the Kenmore works better! That is why I use it. On the Food Saver's, I noticed problems with the seal. They like to fall off! Which is really annoying. I will devote a post to shrink wrapping at another time.

1 Cup brown sugar, packed
3/4 Cup sugar
1 1/2 Teaspoons vanilla
2 Large eggs
2 1/2 Cups all-purpose flour
1 Teaspoon salt
1 1/4 Teaspoons baking soda
1 Cup walnuts, coarsely chopped
3 Cups semi-sweet chocolate chips
DIRECTIONS:
In a large bowl, sift together flour, salt and baking soda; set aside. In a mixing bowl, on medium speed, blend together butter and sugars, until light and fluffy. Add vanilla and eggs, one at a time, on low speed. Incorporate flour into mixture. Add walnuts and chocolate chips. Chill dough. Drop by spoonfuls on a baking sheet. (I used a 1 3/4" cookie scoop). Bake at 400 for 8 minutes. You want these cookies on the pale, tan side. Not golden brown. Yields 56 cookies. Bake what you are going to serve. Freeze the rest!
This recipe was given to me from my mother-in-law. She obtained it through channel 47 TV. I always thought it was weird for a popular cookie shop to give out their recipe. So, since they volunteered the recipe, I see no reason not to pass along this fabulous chocolate chip cookie recipe.
I want to point out something. When making cookies, sometimes the instructions are given to beat until light and fluffy. Here is a photo of what light and fluffy looks like. Notice, it is not flat and grainy. In essence, you beat the sugar and butter for several minutes, until the granules of sugar have dissolved into the butter, like this:

I have a feeling this post is going to be filled with tips! Another bit of advice I would like to give, when any recipe calls for vanilla, get real vanilla! Do not waste your money on expensive imitation vanilla extract. If you happen to have a Sam's Club or Costco membership, you can buy the real vanilla for the price of the imitation stuff sold at the local grocery store!
Now, since this recipe yields 56 cookies (using a 1 3/4" cookie scoop), I flash freeze the scooped cookie dough, onto a baking sheet. After the dough is frozen solid, I shrink wrap, for future use. This is convenient, for our family, as we are not going to eat 56 cookies in a short amount of time. Really, do you want to eat cookies, the next day, that are stale? Or do you prefer your cookies baked fresh? I think it's a no brainer that people enjoy freshly baked cookies, over stale cookies pulled out of Grannie's cookie jar.


A quick mention on shrink wrapping systems. I've picked up several Food Saver brand systems from yard sales. They work good. They work just as good as this Kenmore system. In fact, the Kenmore works better! That is why I use it. On the Food Saver's, I noticed problems with the seal. They like to fall off! Which is really annoying. I will devote a post to shrink wrapping at another time.

HUNGRY BEAR CHOCOLATE CHIP COOKIES
INGREDIENTS:
1 Cup un salted butter, softened1 Cup brown sugar, packed
3/4 Cup sugar
1 1/2 Teaspoons vanilla
2 Large eggs
2 1/2 Cups all-purpose flour
1 Teaspoon salt
1 1/4 Teaspoons baking soda
1 Cup walnuts, coarsely chopped
3 Cups semi-sweet chocolate chips
DIRECTIONS:
In a large bowl, sift together flour, salt and baking soda; set aside. In a mixing bowl, on medium speed, blend together butter and sugars, until light and fluffy. Add vanilla and eggs, one at a time, on low speed. Incorporate flour into mixture. Add walnuts and chocolate chips. Chill dough. Drop by spoonfuls on a baking sheet. (I used a 1 3/4" cookie scoop). Bake at 400 for 8 minutes. You want these cookies on the pale, tan side. Not golden brown. Yields 56 cookies. Bake what you are going to serve. Freeze the rest!
Friday, June 22, 2012
Coconut Bon Bon 'Cakes
I enjoy making pancake recipes. I think my recipes tend to be more dessert-like though. I mean, who's kidding who? Pancakes aren't part of a healthy breakfast, are they? Come on! We all know they are dessert ;)

Last week I made a terrific batch of Chocolate Coconut Pancakes. They were so good, that that is all I ate for the next four meals! Alas, I didn't write that recipe down. I did think, though, if I added Maraschino cherries to the batch, they would taste like coconut bon bons. My goal was to make pancakes that would taste as good as the bon bons, my friend, Joann Repp makes.

In my batter I included: mini chocolate chips, coconut and Maraschino cherries! The batter looks so festive.

But the pancakes taste even better! So, to show my thanks to a family friend, for sharing her bon bon recipe, and because it isn't right to have candy for breakfast. I bring to you:
Coconut Bon Bon 'Cakes

INGREDIENTS:
1 Cup Bisquick baking mix
1 Cup flour
3 Tablespoons quick oats
2 Tablespoons butter flakes1 Tablespoon sugar
1 Tablespoon baking powder
3 Tablespoons mini chocolate chips
1/4 Cup flaked coconut
1 Cup non fat milk
3/4 Cup heavy whipping cream
2 Teaspoons coconut extract
6 Maraschino cherries, minced
DIRECTIONS:
In a large mixing bowl, combine dry ingredients. Stir in wet ingredients, until batter is smooth. Heat a large pan, or griddle to medium-high heat. Lightly coat with vegetable oil. Pour 1/4 cup batter to form a pancake. Cook 2 - 3 minutes on each side, until golden brown. Flip and continue cooking for 2 - 3 minutes. Makes 14 pancakes.
Monday, June 18, 2012
Parmesan Pull Aparts
This is a new recipe, I created. I wanted a savory pull apart bread that would compliment spaghetti. This fits the bill!
The recipe starts with a crescent roll dough. The dough is slathered with butter. Cheese and spices are sprinkled on top.


If it happens to be a really hot day outside, feel free to let it proof outdoors! You will want to put a lid over the pan, to prevent the dough from escaping.

The dough is ready when the pan has filled with risen dough. This is a general rule in baking breads. Often, bakers are in a rush and do not allow the dough to fully rise. The goal is for the dough to fill the pan.

Bake at 350 until golden brown. To test for doneness, place a thermometer into the bread and check for a reading of 185.

Invert on a cooling rack, or butcher's block. Serve immediately! With butter, if desired.

Go ahead! Tear into it. The pieces will pull apart. Hence the name, Parmesan Pull Aparts.

The recipe starts with a crescent roll dough. The dough is slathered with butter. Cheese and spices are sprinkled on top.

Then cut, and rolled into miniature rolls. I cut the dough with a pizza cutter, and used a large offset spatula as my guide.


Once the dough is rolled, place into a well greased bundt pan, covered with plastic wrap.

If it happens to be a really hot day outside, feel free to let it proof outdoors! You will want to put a lid over the pan, to prevent the dough from escaping.

The dough is ready when the pan has filled with risen dough. This is a general rule in baking breads. Often, bakers are in a rush and do not allow the dough to fully rise. The goal is for the dough to fill the pan.

Bake at 350 until golden brown. To test for doneness, place a thermometer into the bread and check for a reading of 185.

Invert on a cooling rack, or butcher's block. Serve immediately! With butter, if desired.

Go ahead! Tear into it. The pieces will pull apart. Hence the name, Parmesan Pull Aparts.

Parmesan Pull Aparts:
1 Tablespoon olive oil
1 Tablespoon butter, softened
DOUGH:
3/4 Cup milk
1/2 Cup water, 110 degrees
2 Eggs
4 1/2 cups all-purpose flour
1 Teaspoon salt
1/3 Cup sugar
1 Tablespoon dry yeast
4 Tablespoons butter
FILLING:
4 Tablespoons butter, softened
1/2 Cup Parmesan cheese
1 Tablespoon dried parsley
1/2 Teaspoon granulated garlic
1/2 Cup Monterey Jack cheese, finely shredded
DIRECTIONS:
Prepare a bundt pan by brushing olive oil, then softened butter; to ensure a well greased pan. Place dough ingredients into a bread machine, in order given. Run on the dough cycle. Once dough is ready. Roll onto a floured surface, to a 15 X 15" square. Using an offset spatula, spread softened butter over entire surface of the dough. In a small bowl blend Parmesan cheese, parsley and garlic. Scatter the cheese blend over the butter. Top with Monterey Jack cheese. Cut the dough, in half, down the center. Using an offset spatula and a pizza cutter, cut horizontally across the dough. Roll each section, in the same manner you would roll cinnamon rolls. Place rolls in prepared bundt pan. Cover with plastic wrap. Let dough rise, to fill the pan. Bake in a preheated oven at 350 for approx. 30 minutes, until bread is golden brown and temperature tests to 185. Serve hot. Pull pieces of bread from the loaf. Enjoy.
Friday, June 15, 2012
Griddle Me This!
To know me, is to know I love to griddle!
Whether it be on a 1990's special edition Wagner cast iron griddle:


Whether it be on a 1990's special edition Wagner cast iron griddle:

Or on a Farberware Electric Griddle:

There is no denying my love for the griddle. I can't imagine not having a griddle to cook on. They are so practical. A necessary tool for anyone wanting to put food out in a hurry! This photo demonstrates how many foods can be cooked, and coordinated on the griddle. I highly recommend stove top cast iron griddles, such as, Wagner and Griswold. Look for them at yard sales, thrift stores and ebay. Also, I highly recommend the Farberware Electric Griddle. This is a vintage model, and again, you will have to look for them at yard sales and thrift stores, or ebay. I steer clear of teflon coated griddles, or anything teflon coated, for that matter!
Tuesday, June 12, 2012
Orange Julius

Remember the Orange Julius? An icy, dairy based drink, with fruit juice blended in. Often sold at fairs and shopping malls during the 1980's, it was the precursor to the now popular smoothie.

I remember shopping, with my parents, at the Fashion Fair Mall. Mom would buy clothes she didn't need, while dad and I made a b line to the Orange Julius stand. As I recall, they only offered two flavors: strawberry and orange. We generally opted for orange.

In honor of the man who raised me, and to keep his memory alive, I have created my version of the Orange Julius. It is just as good as the icy treat you would get at the stand. I'm sure dad would give, this recipe, his stamp of approval!

Orange Julius
INGREDIENTS:
3/4 Cup orange juice, freshly squeezed
1 Tablespoon sugar
1 Tablespoon instant vanilla pudding mix
1 Tablespoon whipping cream
1/2 Teaspoon vanilla
8 Ice cubes
DIRECTIONS:
Juice oranges and put in a blender. Add remaining ingredients and blend until ice is crushed.
* The magic bullet blender is perfect for making single servings.
VARIATIONS:
1 Cup strawberries
1 Cup crushed raspberries
1/2 Banana added to orange juice, strawberries or raspberries
Sunday, June 10, 2012
Righteous Fried Chicken
I've searched many recipes for the perfect fried chicken.
Some required a soak in brine. Others used a batter. Some were copy cat versions
of Kentucky Fried Chicken. None were worth bragging about. In fact, I had given
up all hope on mastering fried chicken.


I am thrilled to say
that this is the best fried chicken I've ever made. It is light, crispy and
flavorful. In fact, it's so good, I'm naming it:
Righteous Fried Chicken

1 Whole fryer, cut
up
2 Teaspoons
paprika
1/4 Teaspoon
granulated garlic
1/4 Teaspoon onion
powder
1 1/2 Cups
buttermilk
2 Cups all purpose
flour
3/4 Teaspoon baking
powder
3/4 Teaspoon baking
soda
1 Teaspoon onion
powder
1 Teaspoon granulated
garlic
1 Teaspoon chili
powder
2 Teaspoons
salt
1 Teaspoon
pepper
Shortening, for
frying
Place cut up chicken
in a large bowl. In a small bowl, combine paprika, granulated garlic and onion
powder. Sprinkle spices over chicken. Cover bowl with plastic wrap and
refrigerate for several hours. Pour buttermilk over seasoned chicken and
continue to marinade for an hour. In a large mixing bowl combine: flour, baking
powder, baking soda, onion powder, granulated garlic, chili powder, salt and
pepper. Line a cookie sheet with waxed paper. Dredge chicken in flour mixture;
coating well. Place dredged chicken on the cookie sheet. Let chicken sit while
you heat your oil to 340 degrees. Cook chicken In a large, deep pan, or a deep
fryer (I prefer the deep fryer). Cook chicken for 20-25 minutes, until a meat
thermometer reaches 180 degrees.
Subscribe to:
Posts (Atom)